
How To Customize POS Receipt In Odoo
In basic words, each time clients visit your shop and purchase something or make an exchange, they are fundamentally trying out deal exchange.
Odoo gives a POS framework that depends on a shrewd point of interaction that any retail organization can utilize without any problem. It is not difficult to utilize and a client can undoubtedly set up shops/stores anyplace and whenever.
Customize POS Receipt In Odoo

And the POS receipt or the bill receipt generated by this POS looks something like this:

Now Odoo POS provides us with a provision to customize this POS screen & the POS receipt according to our preferences.
In this blog, we are going to see how we can customize an Odoo POS receipt.
So, before we begin let us run-through some steps we are going to do for the POS receipt customization.
1) Inherit the ‘point_of_sale’ module in Odoo by creating a custom module.
2) Inherit the template of POS receipt in ‘point_of_sale’ module in Odoo.
3) Make the changes in the POS receipt template.
So, let us start.
First of all, we need to inherit the template of POS Receipt from the ‘point_of_sale’ module.
We are using a custom module to customize this POS receipt in Odoo. If you don’t know the process to create a custom module, you can read our below mentioned post.
Read Here : How To Create Custom Module in Odoo
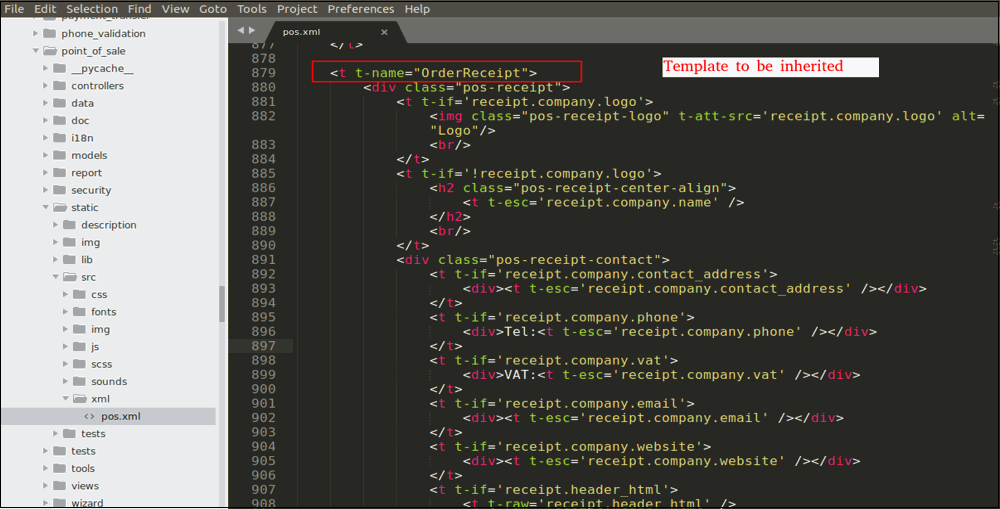
The template for the POS Receipt which comes by default is present in the ‘pos.xml’ file.
This file is present in ‘point_of_sale > static > src > xml’ folder in the point of sale module. Before, version 13, there were separate templates for the receipt that shows up on the screen & the receipt that comes out of the printer.
But in version 13, there is a single template for both: ‘OrderReceipt’. We’ll inherit this template & make our custom changes in this template.
The inheritance of the template is slightly different from what we do in the inheritance of the qweb where we use ‘<xpath>’ to give path for inheritance.
Here, we’ll use ‘<t-extend>’ to give the path of the template we are inheriting.
And we’ll use ‘<t-jquery>’ and ‘<t-operation>’ to apply the changes.
In this case, we’ll try to change the POS receipt and add the customer name to the POS receipt if a customer is selected at the screen for that order.
< ---- Code Starts ---- >
<?xml version="1.0" encoding="UTF-8"?>
<templates id="template" xml:space="preserve">
<t t-extend="OrderReceipt">
<t t-jquery=".pos-receipt .pos-receipt-contact" t-operation='append'>
<t t-if='receipt.client'>
<div>Client:<t t-esc='receipt.client' /></div>
</t>
</t>
</t>
</templates>
< ---- Code Ends ---- >
In the Above Code:
1) templates id= “template” ; because we are inheriting the template record.
2)<t t-extend="OrderReceipt"> ; Extending the template ‘OrderReceipt’.
3) <t t-jquery=".pos-receipt .pos-receipt-contact" t-operation='append'> ; Mentioning the name of the class that we are applying operation on, in this case we have to inherit the ‘pos-receipt-contact’ class of the ‘pos-receipt’ class. And mention the operation that we need to perform. In this case, we are adding the ‘client name’ to the ‘pos-receipt-contact’ class so we’ll use ‘append’.
4) <div>Client:<t t-esc='receipt.client' /></div> ; Adding the Client name to the receipt.
"Important Note: In case, you want to change the whole layout of the receipt, you can use operation ‘replace’ on the class ‘pos-receipt’."
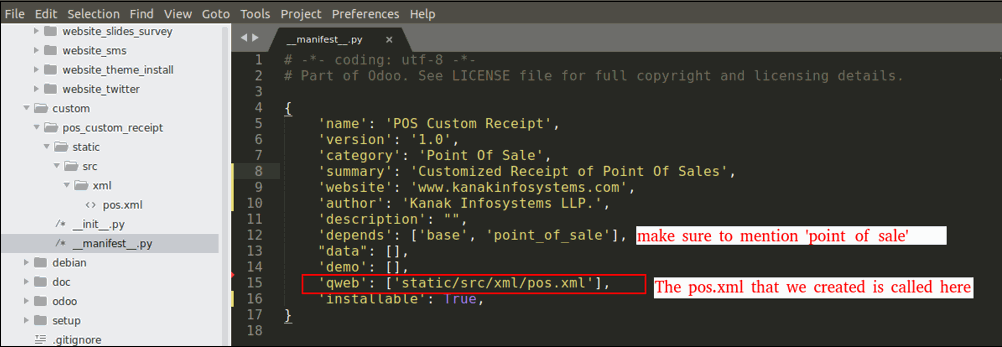
Now the xml file is done. Next step is to make sure that the ‘__manifest__.py’ file is configured properly.
< ----- Code Starts ----->
{
'name': 'POS Custom Receipt',
'version': '1.0',
'category': 'Point Of Sale',
'summary': 'Customized Receipt of Point Of Sales',
'website': 'www.erpcall.com',
'author': 'Techno india.',
'depends': ['base', 'point_of_sale'],
"data": [],
'demo': [],
'qweb': ['static/src/xml/pos.xml'],
'installable': True,
}
< ---- Code Ends ---->
After the ‘__manifest__.py’ file is done, the module is ready to be installed. Just install the module & you can see that the POS receipt is inherited & the client/customer name would be showing where we added the field.

Thus, we can easily customize the POS receipt in Odoo following these simple steps.
If you want any assistance regarding Odoo Development or Odoo Modules/Apps, get touch with us via fill the Contact Us Form.or call at +91-9170-63131